
A cold wall can make an otherwise comfortable home feel drafty, damp, and expensive to heat. If you’ve ever noticed one room staying chilly no matter how high the thermostat goes or found condensation forming on an external wall, you’re likely dealing with poor insulation. When insulating from the outside isn’t practical, internal wall insulation becomes the most effective solution.
This guide walks you through how to insulate a cold wall from the inside, explains the main methods, highlights common mistakes, and helps you choose the right approach for your home whether you’re planning a full renovation or a targeted upgrade.
Why internal insulation makes such a big difference
Cold walls are usually external walls that lose heat faster than the rest of the house. In older buildings, solid brick walls are especially prone to heat loss because they lack a cavity. Insulating from the inside adds a thermal layer between your living space and the cold structure, reducing heat transfer and improving comfort almost immediately.
Benefits often include:
-
Warmer rooms and fewer drafts
-
Lower heating bills
-
Reduced condensation and mould risk
-
More consistent indoor temperatures
I insulated one particularly cold bedroom wall in my own home, and the difference was noticeable the same evening—the room held heat longer and felt less “damp” even before redecorating.
Step 1: Assess and prepare the wall properly
Before installing any insulation, preparation matters more than most people expect.
Check for damp or moisture
Never insulate over a damp wall. Trapped moisture can lead to mould, rot, and long-term structural issues. Look for:
-
Peeling paint or wallpaper
-
Dark patches or mould growth
-
Musty smells
If you find damp, fix the cause first—leaking gutters, cracked masonry, or rising damp—before insulating.
Prepare the surface
-
Move furniture away
-
Remove skirting boards, sockets, and switches
-
Strip wallpaper if needed
-
Ensure the wall is clean, dry, and reasonably flat
This stage might feel slow, but skipping it often leads to insulation failure later.
Understand vapour control
Warm indoor air carries moisture. If that moisture reaches a cold surface inside the wall, it condenses. A vapour control layer (VCL) helps prevent this. Solid walls almost always need one; cavity walls sometimes don’t, depending on construction and insulation type.
Step 2: Choose the right insulation method
There’s no single “best” way to insulate a cold wall from the inside. The right choice depends on wall condition, space constraints, and budget.
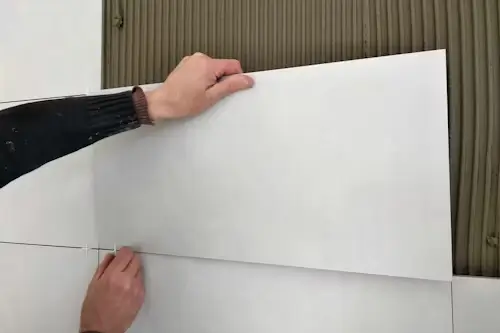
Option 1: Insulated plasterboard (space-efficient and popular)
This is one of the most common solutions, especially in lived-in homes.
How it works:
Rigid insulation boards (often PIR or phenolic foam) are bonded to plasterboard and fixed directly to the wall using adhesive (dot-and-dab) or mechanical fixings.
Pros:
-
Minimal loss of room space
-
Faster installation
-
Clean finish ready for decorating
Cons:
-
Requires a fairly flat wall
-
Thermal bridging can occur at edges and fixings
-
Less forgiving on very uneven masonry
This method works particularly well in bedrooms, living rooms, and flats where space is limited.
Option 2: Internal stud wall (best performance)
For very cold, uneven, or problematic walls, a stud wall system offers the most robust solution.
How it works:
A timber or metal frame is built slightly away from the wall. Insulation batts or rigid boards are placed between studs, followed by a vapour barrier and plasterboard.
Pros:
-
Excellent thermal performance
-
Reduces thermal bridging
-
Handles uneven walls well
-
Space for services (cables, pipes)
Cons:
-
Reduces room size more
-
Higher cost and labour
-
More complex installation
If comfort is the priority and space allows, this method delivers the best long-term results.
Option 3: Thermal plaster or insulating paint (limited impact)
These products are often marketed as quick fixes.
How they work:
Special coatings with insulating additives are applied directly to the wall.
Pros:
-
Easy to apply
-
Minimal disruption
-
Low cost
Cons:
-
Limited insulation value
-
Won’t solve serious heat loss
-
Best as a supplementary measure
These options can slightly improve surface temperature but shouldn’t be relied on for truly cold walls.
Step 3: Install with attention to detail
Regardless of the method you choose, installation quality determines success.
Seal every gap
Even small air leaks can undermine insulation. Use:
-
Foil tape on board joints
-
Expanding foam around edges
-
Acoustic sealant around frames
Manage electrical fittings
Sockets and switches must be extended forward so they sit flush with the new wall surface. Leaving gaps around electrical boxes is a common source of cold drafts.
Support rigid boards properly
On solid walls, mechanical fixings often provide better long-term security than adhesive alone, especially in older buildings.
Moisture management: the most overlooked step
Internal insulation changes how a wall behaves. Without proper moisture control, condensation can form behind insulation where you can’t see it.
Key points:
-
Use a vapour control layer when required
-
Tape all VCL joints carefully
-
Avoid puncturing the barrier unnecessarily
-
Ensure good room ventilation
If you’re unsure, building physics software or a professional assessment can confirm whether a vapour barrier is necessary for your wall type.
Choosing the right method
Imagine a Victorian terraced house with solid brick walls. The front bedroom is always cold and shows condensation in winter. External insulation isn’t allowed due to planning restrictions.
In this case:
-
Insulated plasterboard improves comfort but may still allow cold bridging
-
A stud wall with mineral wool and a vapour barrier offers better performance
-
Thermal paint alone wouldn’t solve the issue
Matching the method to the building type makes the difference between a temporary improvement and a lasting solution.
Common mistakes to avoid
-
Insulating over damp walls
-
Skipping vapour control
-
Leaving gaps around windows and doors
-
Compressing insulation (reduces effectiveness)
-
Ignoring ventilation after installation
These mistakes are far more costly to fix later than doing it right the first time.
How much warmth improvement can you expect?
While results vary, many homeowners report:
-
Rooms warming faster
-
Reduced cold-wall drafts
-
Lower heating usage
-
More even temperatures
You won’t eliminate heat loss entirely, but internal insulation can dramatically improve comfort—especially in older homes.
Related: How Much Is a 1971 Half Penny Worth Today? Value & Price
Conclusion
Learning how to insulate a cold wall from the inside is about balancing performance, space, and moisture control. Insulated plasterboard offers a fast, space-saving fix; stud walls deliver the best thermal results; and thermal coatings can help in limited situations.
The key is preparation, correct method selection, and careful installation. When done properly, internal wall insulation transforms cold, uncomfortable rooms into warm, usable spaces that feel better year-round.
FAQs
Is internal wall insulation worth it?
Yes, especially when external insulation isn’t possible. Comfort and energy savings are usually noticeable.
Will insulation cause damp?
Not if moisture issues are addressed first and vapour control is used correctly.
How much space will I lose?
Insulated plasterboard may reduce room size by 40–70 mm, while stud walls can take more.
Can I DIY internal insulation?
Simple systems are DIY-friendly, but moisture control and detailing must be done carefully.
Do I need planning permission?
Usually no for internal insulation, but listed buildings may require approval.
If you want, I can also help you choose insulation thickness, calculate heat-loss savings, or compare materials like PIR vs mineral wool for your specific wall type.